We'll begin by presuming that you've already had the processed image returned. For the purpose of this
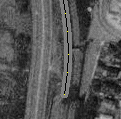
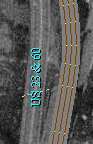
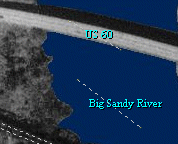
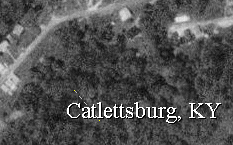
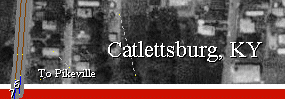
tutorial, we'll create a simple map. I've chosen Big Sandy Jct., located at milepost CA513.9 on CSX's
Kanawha Subdivision in the town of Catlettsburg, KY. At the junction, the Big Sandy Sub diverges from
the Kanawha Sub and heads south along the Big Sandy River to the eastern Kentucky coalfields. The
Kanawha Sub climbs up a curved viaduct to cross over the Big Sandy River and then follows the Ohio
River eastward.
Note that throughout this document I'll reference project number 9675. When creating your map, be sure
to use the project number that you have been assigned, and not 9675.
First, we need to create the appropriate YD files for this project. Since the image is 9675.jpg,
.yrd and .his files with similar names will also need to be created. In the
Yard Duty/Construction directory, you'll find the files 9999.yrd and 9999.his.
Open 9999.yrd using Notepad. From the File menu, choose Save As.... Make
sure you're in the Construction directory, then enter 9675.yrd as the file name.
Before you save, change the Save as type pulldown to All Files. (If you don't do
this, the file will be saved with a .txt extension, and will have to be manually renamed before being
able to be used in YD.) Now, save the file. Repeat these steps to create a 9675.his from the
9999.his file.
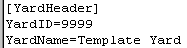
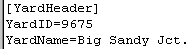
Open 9675.yrd. Ignore the first four lines, they're stuff used by the game. Under
[YardHeader], there are two lines that need to modified. The first is YardID; change
this value to 9675. Next, delete "Template Yard" from the YardName line, and type in the name
of your yard. Disregard the remainder of the file; again, this is information used by Jim.
| Before | After |
 |  |
| Note that only the yard's name, and not the state, are entered in the
.yrd file. |
| Save the file and then open 9675.his. Modifying this file is much
simpler: |
| Before | After |
 |
Save the file and close Notepad; we'll return to 9675.his
later.
In Yard Duty, to load a map go to Map/Load Custom Map, or press Ctrl+D. Choose
9675.yrd from the list of available yards. Once the map appears on-screen, take a look around,
do some reconnaissance, get an idea of what lies where.
| Enter Design Mode by clicking the Design button. A toolbar
appears at the bottom of the screen: |
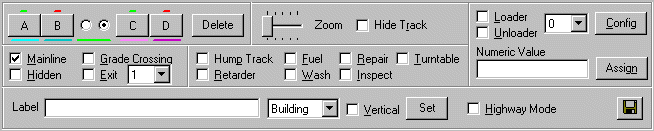 |
- A, B, C, and D are the four types of lines you'll
use to draw track, and the colors they appear in are shown below the buttons. C is the primary
line, B and D are only used for drawing the diverging legs of turnouts, and
A is used to go the "other way" when the C end of the segment you're drawing from has
already been used. The green and red bars above the buttons indicate turnout orientation: Relative to
the active section (see next), the A and C segments will be selected when the turnout is
"green," and the B and D segements will be selected when the turnout is "red." See the
turnout tutorial for visual aids. Don't worry if all this seems complicated
at first; each of these lines will be used later on, and you'll soon get comfortable with them.
- The two radio buttons hovering over the green line represent the active section of track. The
buttons show which endpoint of the active piece is selected: The A/B or the C/D end.
Pressing the spacebar flips the active endpoint. From the selected segment, you can use the
A, B, C, and D keys to move to the appropriate adjacent segment.
- The Delete button deletes the active segment. Pressing the Del key performs the same
action.
- The Zoom function allows you to get a detailed view of complicated
track arrangements. However, note that it is not recommended that you draw all your trackwork while
zoomed in.
- Hide Track (R) hides the tracks you've drawn, but the endpoints are still visible.
This feature is valuable for precision alignment of curves and turnouts based on the real trackage.
- The Loader (L) and Unloader (U) checkboxes allow
you to designate a segment of track as a siding that can load and unload cars. Loaders are purple,
unloaders are green, and load/unload tracks (perform both functions) are orange.
- The pulldown list of numbers allows you to assign a siding number to any previously-designated
siding.
- The Config button opens a popup window that allows you to choose the various types of cars a
siding can handle. Multiple car types can be selected by holding down the Ctrl key while clicking.
- The Numeric Value entry box allows quick configuring of sidings without having to manually
choose the cars from the Config popup every time. To use this feature, configure a siding, then
click OK. Click Config again, and at the bottom of the window will be a Numeric Value.
Enter this number in the Numeric Value box. Draw another segment, designate it as a siding, then
click the Assign (N) button to apply the configuration you selected.
- Selecting Mainline (M) designates a segment as a mainline.
Mainline tracks are brown and allow trains to travel up to 60mph (normal, black, tracks have a speed
limit of 40mph).
- Selecting Grade Crossing (G) designates a segment as a grade crossing. When a train
is on the tracks sections immediately adjacent to the crossing, a bell sound will play.
- Selecting Hidden (H) renders a segment invisible. This is used for tracks going under
bridges, through tunnels, and within indoor or sheltered sidings.
- Selecting Exit (E) designates a segment as an exit line. You must choose an exit number
from the pulldown list before designating a segment as an exit line, and all exits must have unique
numbers.
- Selecting Hump Track designates a segment as the crest of a hump.
This piece of track must be laid in the direction of travel over it; i.e., when it is the active
segment, the segment towards the classification yard will be light purple (C) and the segment
towards the receiving yard will be light blue (A). (See sample image.)
When a selected coupler moves over the hump piece at a speed equal to or less than 5mph, the car will
be uncoupled and accelerate to 15mph.
- Selecting Retarder designates a segment as a retarder. These pieces will stop a free-rolling
car (or cut of cars) that are not coupled to an engine, and are placed at the end of classification tracks.
- Selecting Fuel designates a segment as a fueling track. Engines in YD carry enough fuel to
travel 3,000 miles; after they've traveled that far, they run out of fuel and are unable to generate
power.
- Selecting Wash designates a segment as a wash rack, which will clean cars in need of washing.
- Selecting Repair designates a segment as a repair track, which will fix cars in need of repair.
- Selecting Inspect designates a segment as an inspection track, which will randomly select
cars to to be cleaned or repaired. An inspection track must be placed along all primary entrances to
yards that contain either repair or wash facilities.
- Selecting Turntable (T) generates a turntable with a radius equal to the length of the
selected segment. Turntables in Yard Duty are merely decorative and do not function.
- The series of devices on the bottom allows you to place a text label on the
active segment. First, type the text in the Label box. Next, choose the type (see
Text type usage in the MDR), select Vertical if the
situation requires it, and finally click Set to apply the text to the active segment.
- Turning on Highway Mode allows you to draw roads. Vehicles move on roads in the same way
trains move on tracks, although they are all under computer control. Designate an exit at the
entrance where vehicles are to appear on the map; where the vehicles are to exit, merely let the
highway end, and the vehicle will disappear when it reaches the end of the line. Setting a highway as
a mainline allows cars to travel at 60mph, while setting a highway to an inspection track limits vehicles
to 15mph.
- The floppy disk icon allows you to Save your work at any time, and it is recommended you do
this frequently to avoid losing your work if YD crashes (it's been known to happen). Maps are
automatically saved whenever you close the map or exit Design Mode.
|
Before we start laying track, there's one important thing I'll say first: Just because
you've placed a track segment does not mean that it's set in concrete. If you find that you don't
like the way something looks, simply delete it and lay the track again.
The best place to start laying track is at the edge of the map, with one of the exit lines. First, hit
the C button. A line will appear from the top-left corner; hit ESC to cancel drawing
that line. Then, next to the edge of the map, click to place your first endpoint. Bring the line
across the border by a few pixels, and click again to place the second endpoint. You've created an exit
line!
Notice that the line you've just placed is green, denoting that it is the active line. The purple line
below it is attached to the mouse cursor (not shown), and indicates that you are preparing to lay another
line using the C type, which is correct. We will come back later to place the
primary track elements on this track.
When laying track, I generally will continue placing one track until I run into an obstacle. An obstacle
can be a turnout, a curve, or some other situation where you anticipate having to spend time carefully
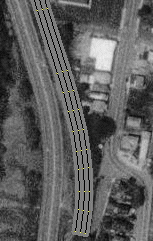
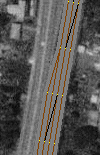
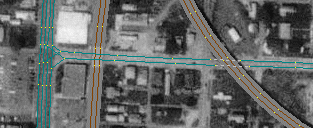
laying track. In this instance, the primary obstacle on the map is the interlocking for the junction.
Since the signal bridges at each end are clearly visible, I chose to bring my first line down to there.
As it turns out, I ended up bringing my track slightly past the signal bridge, since I know that railroads
usually don't place turnouts in curves.
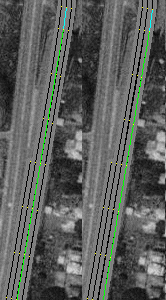
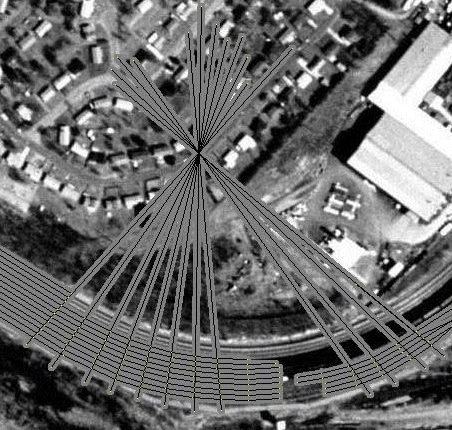
Since the interlocking is my current obstacle, I returned to the top of the map and laid down the other
two mainlines to that point. Note how I draw the parallel tracks: Each track has an equal number of
segments, and each parallel set of segments are of almost equal length. Imagine the spokes of a bicycle
wheel; if you were to connect the dots of each set of endpoints, and then extend the line towards the
center of the arc formed by the tracks, you should obtain a result much like the radial spokes of a
bicycle wheel. (Corey Vernier kindly provided this
demonstration of the technique in use.) To adjust endpoints of a track, simply use the arrow keys
to move the endpoint one pixel at a time. To make larger jumps, hold down the shift key and gain 10
pixels per arrow key. Holding down the Ctrl key modifies each of the previous two movements to affect
every piece of track on the map.
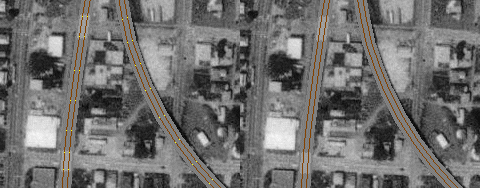
One thing I cannot stress enough is how important the creation of smooth transitions between tangent
(straight) and curved track is. Real railroads insert a spiral easement between tangent track and the
constant-radius curve to ensure that the stresses in the track structure resulting from the movement
of a train don't change too suddenly, and this translates into a visually pleasurable effect that is easy
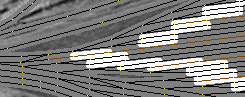
to recreate in YD. Study the curves in the screenshot above and you'll notice that with each successive
segment, the angle from which it diverges from the previous one increases by one increment. This is
measured by the number of "breaks" between the endpoints (the bottom lines each have three breaks).
Obviously, you'll notice that my example violates my own rule; the rule is for ideal situations, and
there are bound to be places where you'll have to have a steeper angle in order to get the trackwork to
fit properly.
We've now reached the interlocking, and it's time to draw turnouts and crossovers. There are two hard
rules for turnouts, and one soft rule:
- When the turnout state is "green" (normal), the straight route must be lined. When the turnout is
"red" (reverse), the diverging route must be lined.
- All three legs of a turnout must be of equal length, and all similar turnouts on a map must be of
the same size. (In exceptional situations, such as complex compound yard ladders, this rule can be
waived.)
- The turnout must be of the proper length, which is reached when the green or red indicator is between
four and six pixels long. In other words, draw the turnout so it "looks right." Study other maps for
examples; note that the turnouts shown in the Turnout Tutorial represent
mainline turnouts and are about the longest turnouts that are allowed.
|
The first step will be to draw the parallel straight segments through the interlocking. Opposite of what
I did at the beginning of this tutorial, this time I started with the main on the right since that track
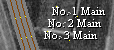
continues straight through the interlocking. Just for clarity, we'll call the mains numbers 1 through 4
from right to left. One trick I've developed for ensuring a series of short lines is perfectly straight is
to draw them all out, then use the B or D line types to draw a single straight line along
the entire length of the tangent; I then go back and adjust endpoints. If done properly, you'll be able
to make almost all of the segments of equal length.
Note how the unadjusted #2 main doesn't quite conform to the long line, but the #1 main has been adjusted
to fit almost perfectly. Also, even though I'm not yet quite sure where it begins, I've located the #4
main alongside the #3 main. Now that I know that #1 main is correct, I'll adjust the endpoints of the
other three to fit.
I happen to possess a schematic of this interlocking, so it was pretty easy for me to figure out where
the turnouts and crossovers go. I'll start at the top end and work my way south:
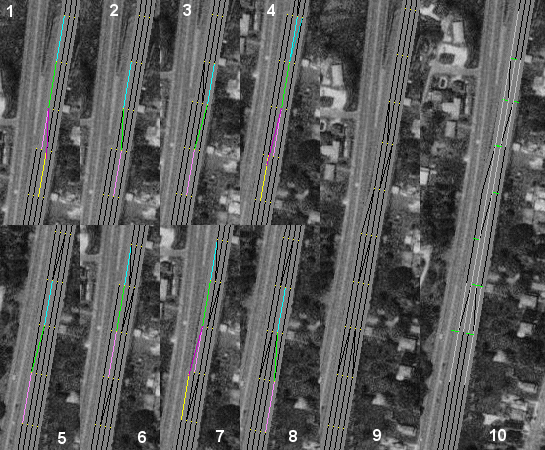
As you can see in Steps 6 and 7, I located where the turnout leading to #4 main was going to diverge,
and before I laid the turnout I deleted the two extra lines. Also, as you can see in Step 10, these are
all obviously medium-speed mainline turnouts, and thus have green/red indicators that are 6 pixels long.
If you find yourself in a situation where you have high-speed turnouts, draw two separate segments
between the tracks. Here's an example from the CP-169 map (#1125) to explain what I mean:

The high-speed crossover at left is actually two separate turnouts put together end-to-end. The extended
"crossover" at right (actually the straight route of the mainline) has the extra section in the middle
(above the "169") to allow the top track to achieve proper spacing before the middle track splits from
the bottom track.
After passing through Big Sandy Jct., there aren't any more obstacles to encounter on the map, so I'll
finish the remainder of the trackwork.
Now we'll work our way through the primary track tools. These are the four
modifications to trackage that you'll use most, and they all have a hotkey assigned to make their use
even easier.
First, we'll add mainlines. Since every track on the map is designated in the timetable as a mainline,
it goes without saying that all will be assigned mainline status. However, one important note is that
crossovers are never assigned mainline status. (Of course, there are the occasional exceptions,
such as the high-speed crossover at CP-169 shown above.) Simple turnouts that have a mainline on the
diverging route can be designated as such. On other maps, only the primary through routes will be
designated as mainlines, and the rest of the trackage will remain black.
Next, we look at hidden trackage. There aren't any roads crossing the tracks at Big Sandy Jct., nor
are there any tunnels. However, one of my quirks as a designer has been to designate trackage over
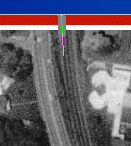
through-truss bridges as hidden:
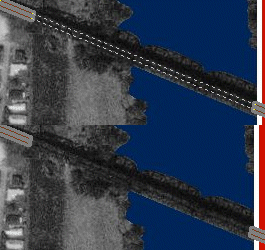
The Kanawha Sub passes through Catlettsburg on a fill, so it doesn't interfere with traffic on the city
streets. However, just south of the junction, the Big Sandy Sub
drops
to street level, and there are a number of grade crossings:
Exit lines are the last of the primary tools. First choose the exit number you wish to assign, then
select the exit checkbox. Let's number the three mainlines at the top of the map:

However, you'll notice that the numbers overlap somewhat. So, we have to adjust the endpoints to get
the numbers properly separated, but at the same time don't get so wild that the exit lines look bad:

Much better! There are other ways of doing this; check out the south end of Hamlet Yard for a good
example. Also, it is important to note that due to a bug, exit lines can not be perfectly
horizontal or vertical; offset the ends by one pixel if such a situation
occurs.
Most of the secondary track tools are pretty self-explanatory with regard to where they should be
located. If you need to designate the trackage as hidden, be sure to leave a small section of track
outside the hidden area designated as that track type to alert users to its presence:

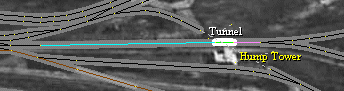
Hump and retarder tracks are unique enough in their applications that they need special mention. Hump
tracks must be laid in the direction that cars will travel over it; i.e., when it is the active
segment, the segment towards the classification yard will be light purple (C) and the segment
towards the receiving yard will be light blue (A). Here's Selkirk's hump:
Retarders stop free-rolling cars to prevent them from rolling out onto ladders. This is how they
were implemented at Hamlet:
Note that retarders are invisible when playing the game.
Sidings, where cars are loaded and unloaded, are one of the most important parts of the game. To place
one, merely draw a piece of track where the industry is, designate the track as a loader, unloader or
both, assign a siding number, and configure the car types.
The proper method for assigning a hidden siding is to have "dummy" sidings on at least one side to
indicate the presence of the siding. The dummy sidings are not assigned a number nor configured to
handle any cars.

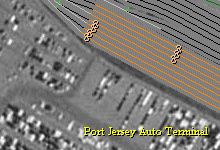
Note that coal mines and intermodal terminals should not have siding numbers assigned since these are
unit train operations where having multiple sidings assigned would be contrary to the nature of
the train.
The Config button brings up a window where you can select the types of cars that are handled
by a specific siding. The Numeric Value at the bottom can be used to quickly assign the same
set of cars to a number of different track segments.
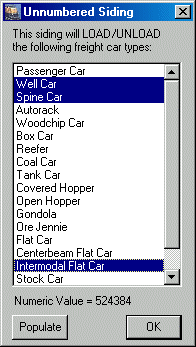
The window also makes note of the status of the siding: It has not been assigned a number, and it will
both load and unload these car types. Note that all intermodal sidings should be configured in
the manner shown here.
Now, let's return to Big Sandy Junction to add some text labels, and then pave some roads for the
townfolk to use.
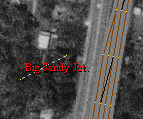
Our first chore would normally be to label Buildings, but since I don't know any of the ones
depicted on this map, we'll skip that and go to Track:

Note how the lines under the text are diagonal and extend beyond the text. Doing this makes it easier
to adjust the labels later.
Next, we'll use the Street type for a couple things:
As you can see, the Street label is also used for labeling bodies of water.
Let's not forget to add a couple City labels so players know where they are!
| Top | Bottom |
 |  |
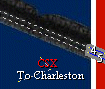
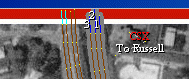
Lastly, we use the Railroad type to finish the "To..." labels and
identify the interlocking:
Highways are drawn the same way as tracks, but you don't have to be quite as precise. Be sure to turn
on Highway mode, and remember that only where vehicles will be entering do you need to place
exits. Exits for highways should be relatively high-numbered so there's no possiblity of causing
interference with rail exit numbering. Also, it is important that you do not create a situation
where vehicles can travel on the same line in both directions. It's fine to have intersections, but
just make sure that traffic in each direction is restricted to a discrete path.
The last step is to create a .his file to describe the map to others. Please review
a sample .his file (which happens to be the one I wrote for Selkirk Yard).
While yours may not contain that much detail, please attempt to note historical owners, current
ownership, and some basic details about the location.
Additionally, you will be required to submit a set of proposed connections with the map so that it can
be properly added to the Yard Duty network. Please be sure you adhere to the
proper format for connections when writing yours to make adding to the server progress more smoothly.
And that's it! If you have any questions, please email
Dave with your query.
